Install Kaspersky on Linux Host (Debian/Ubuntu)
I created this so I wouldn't forget and have to piece this all together (again) when configuring a Linux host in my environment. So, here is a quick and dirty guide to installing the Kaspersky client for Linux on a Debian 7.x host. The same basic instructions could be used for Ubuntu or any other Debian/Ubuntu derivative.
I have also included the instructions for installing the KSC agent for Linux as well so you can manage the host from the Kaspersky Security Center console.
Here goes!
Make sure and have libc installed:
'apt-get install libc6-i386'
Find Kernel Version with this command:
'cat /proc/sys/kernel/osrelease'
Search the APT repsositories for the Linux Headers for your Kernel:
'apt-cache search linux-headers'
Download the headers that correspond to your kernel version:
'apt-get install linux-headers-<kernel_version>'
Download the client from here:
'wget http://products.kasperskylabs.com/products/multilanguage/workstations/keslinux/kes4lwks_8.0.1-50_i386.deb'
Install the Kes4lwks package after you download it:
'dpkg -i --force-architecture kes4lwks_8.0.1-50_i386.deb'
Configure KES4lwks with this script:
'/opt/kaspersky/kes4lwks/bin/./kes4lwks-setup.pl'
(Just accept the defaults for the most part.)
If you are asked for a key file (registration file) you will need to upload it to the folder you are working in and give it the path (Example below);
/root/xxxxxx.reg
If you use an agent to connect to a Kaspersky Admin Console (Kaspersky Security Center):
Download the install package:
wget
Install the agent from the Kaspersky Web Site:
'dpkg -i --force-architecture klnagent_8.5.0-662_i386.deb'
Give it the DNS name or IP address of your server and accept the defaults (unless you have non-standard settings for your KSC Console).
Everything should be done at this point. If you installed the agent make sure and move in the Kaspersky Security Center to a container where you can configure a policy and manage it. (green is good and red is bad).
Wednesday, October 23, 2013
Thursday, October 10, 2013
Automatic email testing
Automatic Email Testing (Daily)
So, I had an issue where a company web page contained a submission form so people could send emails to sales people and request a sales quote. This is a pretty normal thing and is driven by a distribution list on the back end. In my case it is Exchange.
This is all great if the emails are reaching their destination. The problem being sometimes issues occur beyond our control and this stops working for whatever reason. People may quit and someone doesn't get added to the distribution group by mistake, a filter may get deleted that would allow the email to hit your email server, or any number of weird routing issues.
In my case this happened and the emails stopped showing up. People didn't notice for some time and that was NOT a good thing. That being the case, it seems there are very few choices when it comes to setting up an email to automatically send every day without creating calendar events, having people accept the event, then send out a reminder etc. Or maybe creating an Outlook rule that would send an email somehow every day at the some time. Simple enough for internal testing, but a REAL world test? Not so much.
So here is what I did to make that happen. It might be a bit crazy sounding to some people and it might not be super efficient, but it gets the job done.
So here goes. I configured IIS on a Windows Server 2008 R2 machine and told it I wanted to configure IIS as a SMTP Server. Here is a great article on how to configure it:
http://www.chrislazari.com/2011/04/iis-75-installing-smtp-service-securing.html
After IIS is configured to relay emails, you should create a GMail account (I am sure others might be usable as well, but you can't get much more reliable than Google right? :)
So I did that and logged into the GMail account. I then clicked the little settings button like this and selected settings:

Create a forwarding address by clicking on the "Add Forwarding Address" button, like this one:


Make sure the address above is the one you wish to have an email sent to every day for testing (distribution list email etc). Click the next button and an email will be sent to the distribution address to confirm the address exists and someone has accepted Terms Of Service etc. You WILL need to have access to this email and be able to click the link to accept, otherwise GMail will not forward to it.
Once that is done, you should see the email address appear under the "Forwarding and POP/IMAP" screen.
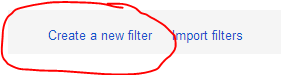 Now we must create a new filter, by clicking here:
Create a filter like the one shown as an example with your email addresses:
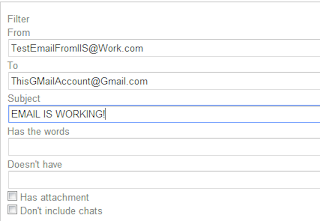
Make notes on what you set there values for:
Now click the button at the bottom of this screen like this:

The next screen should show something like this, but the forwarding address you created in the previous step should be where is says "add forwarding address" instead (Check the "Foward It" button):

GMail configuration should be complete after this and the filter should be in place.
Now we have to go back to our IIS server and tell IIS that we want to send out an email.
Go under the Windows Task Scheduler and tell it you want to create a new task by clicking here:

Now configure the options like these screen shots (substitute your own settings):

Click the "NEW" button to create a new task. (I had already created mine listed here)


This is a quick attempt to created documentation for anyone out there that might face the same issue. I am sure I have left things out, but hopefully most people will get the idea and be able to work with it.
So, I had an issue where a company web page contained a submission form so people could send emails to sales people and request a sales quote. This is a pretty normal thing and is driven by a distribution list on the back end. In my case it is Exchange.
This is all great if the emails are reaching their destination. The problem being sometimes issues occur beyond our control and this stops working for whatever reason. People may quit and someone doesn't get added to the distribution group by mistake, a filter may get deleted that would allow the email to hit your email server, or any number of weird routing issues.
In my case this happened and the emails stopped showing up. People didn't notice for some time and that was NOT a good thing. That being the case, it seems there are very few choices when it comes to setting up an email to automatically send every day without creating calendar events, having people accept the event, then send out a reminder etc. Or maybe creating an Outlook rule that would send an email somehow every day at the some time. Simple enough for internal testing, but a REAL world test? Not so much.
So here is what I did to make that happen. It might be a bit crazy sounding to some people and it might not be super efficient, but it gets the job done.
So here goes. I configured IIS on a Windows Server 2008 R2 machine and told it I wanted to configure IIS as a SMTP Server. Here is a great article on how to configure it:
http://www.chrislazari.com/2011/04/iis-75-installing-smtp-service-securing.html
After IIS is configured to relay emails, you should create a GMail account (I am sure others might be usable as well, but you can't get much more reliable than Google right? :)
So I did that and logged into the GMail account. I then clicked the little settings button like this and selected settings:
Create a forwarding address by clicking on the "Add Forwarding Address" button, like this one:


Once that is done, you should see the email address appear under the "Forwarding and POP/IMAP" screen.
Create a filter like the one shown as an example with your email addresses:

Make notes on what you set there values for:
Now click the button at the bottom of this screen like this:
The next screen should show something like this, but the forwarding address you created in the previous step should be where is says "add forwarding address" instead (Check the "Foward It" button):

GMail configuration should be complete after this and the filter should be in place.
Now we have to go back to our IIS server and tell IIS that we want to send out an email.
Go under the Windows Task Scheduler and tell it you want to create a new task by clicking here:
Now configure the options like these screen shots (substitute your own settings):

Click the "NEW" button to create a new task. (I had already created mine listed here)

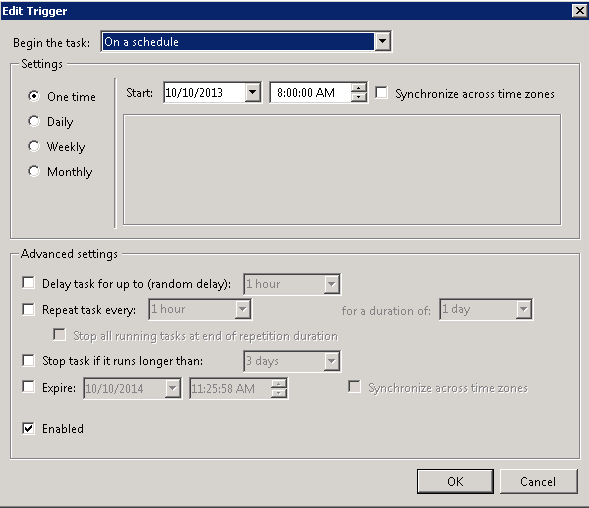
Select "On a Schedule" and enter the time and date info of when you want the email to be sent. Make sure and check the "Enable" button at the bottom of the screen.
Click on the Actions Tab and then click the "New" button. Then under the actions pull down menu select "Send an e-mail". You should see the screen look something like this below. Make sure and enter the email information as you configured it in Gmail so the filtering will work.

Also make sure you have the SMTP Server designated above. Since I am doing all of this on the same server, I have told it to use the "localhost". If you have another SMTP server you can use, you may enter that host name (Or IP Address here).
Click OK here to save the changes. The Conditions, Settings, and History tabs shouldn't need to be configured much (if at all). You will be prompted for credentials here in order for the task to run. I personally used the admin account because this is a standalone server. Your situation may vary a bit. Use whatever account has enough rights.
As a test, you can right-click the task after it has been saved and it should send the email as intended. It will also do this on a schedule. If you want to make sure this is all working make sure and add your email account to the distribution group and make sure you get the email.
Remember, the email is being generated by your SMTP server within your network. Make sure your firewall will allow this SMTP traffic to pass through it.
The email should go from your server to your GMail account. The GMail account looks at this email and then applies the filter to it that we created. The filter we created then forwards the email to the email account you are wanting to test and the people (possibly you) will get the email with your subject line and anything you might have added to the body of the email.
Be careful what you type in the email subject and body. Other people WILL see it.
Things to watch our for:
As stated about make sure the firewall will let the SMTP server send email outside your network.
If the email doesn't show up in your GMail account check the junk email.
If the email doesn't show up in your inbox (if you are a member of the distribution group) it might be in your junk mail or in another mail filter (depending on how your email system is configured).
Also, make sure your Subject, To, and From addresses in your Gmail rule match what you are sending out from your SMTP server. Remember, if the criteria are not met the email will NOT be forwarded.
This is a quick attempt to created documentation for anyone out there that might face the same issue. I am sure I have left things out, but hopefully most people will get the idea and be able to work with it.
Monday, April 22, 2013
Backup Exec 2012 - Removing Tape Drives that will not delete
So I ran into an issue where I could NOT delete an orphaned tape drive in BackupExec 2012. I replaced a defective drive in the tape library and the old drive remained listed in the console under devices. I updated to the latest service packs and looked through the Symantec forums forever and couldn't find the resolution. The drive was always listed as active. I removed any references to it within any jobs, rebooted the server multiple times, removed drivers, etc. No luck no matter what I did. Because it was "active" i could pause it or take it offline, but I was never allowed to delete it!
Before doing ANYTHING below, I suggest following the directions here to backup your database: http://www.symantec.com/business/support/index?page=content&id=TECH83082
Anyway, on to the show.
So, I logged into a server with SQL Server Management Studio and connected to the database (I just happened to have a SQL server running in our production environment :)
I connected to the BackupExec server with the credentials I always use (My Windows Login in this case) using Management Studio.
I then did a simple query to find the devices in the database that were listed. I clicked "New Query" and typed this below:
select * from Device where DeviceID not like 'null' <--"! Execute" from the tool bar.
I then made a note of the DeviceGUID here of the stubborn device that would not delete. It looked something like this "EFACE2BA-1C4A-4ABF-8660-7B92F70165F9". Then I deleted the device entry from the table like this:
delete from Device where DeviceGuid like 'EFACE2BA-1C4A-4ABF-8660-7B92F70165F9'
Again Executing the line above with the "! Execute" from the tool bar.
The message read something like '1 row(s) affected" or something.
Closed out of the Management Studio. Exited of the Backup Exec console and re-launched it. Went to the Devices Screen and the problem device was gone. BAM! Take that!
Anyway, I am not a SQL guru. I know about enough to be dangerous. In this case a little bit of time and experimentation worked out for me. Maybe it will help someone else with this problem.
Subscribe to:
Posts (Atom)